Written by
YoonJae
on
on
[Flutter]bootomNavigation으로 페이지 구성하기
1. 프로젝트 시작하기

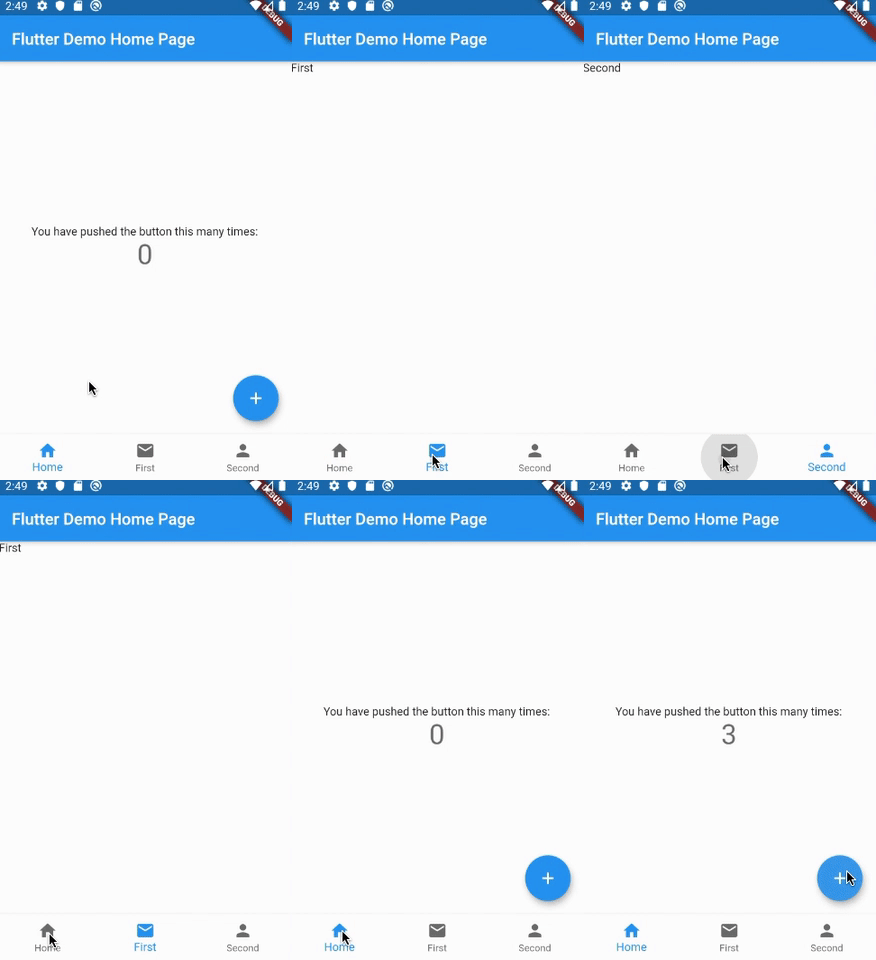
구현 결과 미리보기
flutter create 프로젝트명
프로젝트를 만든다.
2. 메인에 bottomNavigationBar 구성하기
    import 'package:flutter/material.dart';

    void main() => runApp(MyApp());

    class MyApp extends StatelessWidget {
      // This widget is the root of your application.
      @override
      Widget build(BuildContext context) {
        return MaterialApp(
          title: 'Flutter Demo',
          theme: ThemeData(
            primarySwatch: Colors.blue,
          ),
          home: MyHomePage(title: 'Flutter Demo Home Page'),
        );
      }
    }

    class MyHomePage extends StatefulWidget {
      MyHomePage({Key key, this.title}) : super(key: key);
      final String title;

      @override
      _MyHomePageState createState() => _MyHomePageState();
    }

    class _MyHomePageState extends State<MyHomePage> {
      int _counter = 0;

      void _incrementCounter() {
        setState(() {
          _counter++;
        });
      }

      @override
      Widget build(BuildContext context) {
        return Scaffold(
            appBar: AppBar(
              title: Text(widget.title),
            ),
            body: Center(
              child: Column(
                mainAxisAlignment: MainAxisAlignment.center,
                children: <Widget>[
                  Text(
                    'You have pushed the button this many times:',
                  ),
                  Text(
                    '$_counter',
                    style: Theme.of(context).textTheme.display1,
                  ),
                ],
              ),
            ),
            floatingActionButton: FloatingActionButton(
              onPressed: _incrementCounter,
              tooltip: 'Increment',
              child: Icon(Icons.add),
            ),
    // 추가된 bottomNavigationBar
            bottomNavigationBar: BottomNavigationBar(
                type: BottomNavigationBarType.fixed,
                onTap: (index) => {},
                currentIndex: 0,
                items: [
                  new BottomNavigationBarItem(
                    icon: Icon(Icons.home),
                    title: Text('Home'),
                  ),
                  new BottomNavigationBarItem(
                    icon: Icon(Icons.mail),
                    title: Text('First'),
                  ),
                  new BottomNavigationBarItem(
                    icon: Icon(Icons.person),
                    title: Text('Second'),
                  )
                ]));
      }
    }
3. 라우팅할 위젯 만들기
lib/screens/home.dart

    import 'package:flutter/material.dart';

    class Home extends StatefulWidget {
      @override
      _HomeState createState() => _HomeState();
    }

    class _HomeState extends State<Home> {
      int _counter = 0;

      void _incrementCounter() {
        setState(() {
          _counter++;
        });
      }

      @override
      Widget build(BuildContext context) {
        return Scaffold(
          floatingActionButton: FloatingActionButton(
            onPressed: _incrementCounter,
            tooltip: 'Increment',
            child: Icon(Icons.add),
          ),
          body: Center(
            child: Column(
              mainAxisAlignment: MainAxisAlignment.center,
              children: <Widget>[
                Text(
                  'You have pushed the button this many times:',
                ),
                Text(
                  '$_counter',
                  style: Theme.of(context).textTheme.display1,
                ),
              ],
            ),
          ),
        );
      }
    }
lib/screens/first.dart
    import 'package:flutter/cupertino.dart';

    class First extends StatefulWidget {
      @override
      _FirstState createState() => _FirstState();
    }

    class _FirstState extends State<First> {
      @override
      Widget build(BuildContext context) {
        return Container(
          child: Text('first'),
        );
      }
    }
lib/screens/second.dart
    import 'package:flutter/cupertino.dart';

    class Second extends StatefulWidget {
      @override
      _SecondState createState() => _SecondState();
    }

    class _SecondState extends State<Second> {
      @override
      Widget build(BuildContext context) {
        return Container(
          child: Text('Second'),
        );
      }
    }
4. 메인에 구성된 위젯 추가하기
이제 생성한 화면을 메인에 추가해야 합니다. 방금 생성한 위젯을 메인에 import하고 List
    import 'package:example/screens/first.dart';
    import 'package:example/screens/home.dart';
    import 'package:example/screens/second.dart';

    class _MyHomePageState extends State<MyHomePage> {
      int _currentIndex = 0;
    	final List<Widget> _children = [Home(), First(), Second()];

    	void _onTap(int index) {
    	    setState(() {
    	      _currentIndex = index;
    	    });
    	  }
    ...
    ...
    body: _children[_currentIndex],
    bottomNavigationBar: BottomNavigationBar(
                type: BottomNavigationBarType.fixed,
                onTap: _onTap,
                currentIndex: _currentIndex,
    ...
lib/main.dart
    import 'package:flutter/material.dart';
    import 'package:flutter_keep_alive_skeleton/screens/first.dart';
    import 'package:flutter_keep_alive_skeleton/screens/home.dart';
    import 'package:flutter_keep_alive_skeleton/screens/second.dart';

    void main() => runApp(MyApp());

    class MyApp extends StatelessWidget {
      // This widget is the root of your application.
      @override
      Widget build(BuildContext context) {
        return MaterialApp(
          title: 'Flutter Demo',
          theme: ThemeData(
            primarySwatch: Colors.blue,
          ),
          home: MyHomePage(title: 'Flutter Demo Home Page'),
        );
      }
    }

    class MyHomePage extends StatefulWidget {
      MyHomePage({Key key, this.title}) : super(key: key);
      final String title;

      @override
      _MyHomePageState createState() => _MyHomePageState();
    }

    class _MyHomePageState extends State<MyHomePage> {
      int _currentIndex = 0;

      final List<Widget> _children = [Home(), First(), Second()];
      void _onTap(int index) {
        setState(() {
          _currentIndex = index;
        });
      }

      @override
      Widget build(BuildContext context) {
        return Scaffold(
            appBar: AppBar(
              title: Text(widget.title),
            ),
            body: _children[_currentIndex],
            bottomNavigationBar: BottomNavigationBar(
                type: BottomNavigationBarType.fixed,
                onTap: _onTap,
                currentIndex: _currentIndex,
                items: [
                  new BottomNavigationBarItem(
                    icon: Icon(Icons.home),
                    title: Text('Home'),
                  ),
                  new BottomNavigationBarItem(
                    icon: Icon(Icons.mail),
                    title: Text('First'),
                  ),
                  new BottomNavigationBarItem(
                    icon: Icon(Icons.person),
                    title: Text('Second'),
                  )
                ]));
      }
    }
마무리
이번 글에선 bottomNavigationBar를 이용해 앱을 구성해 봤습니다. 아직 flutter 구조를 잡는거에 정답은 없는거같습니다만 현재 사용하는 대부분의 앱에서 하단에 버튼을 이용해서 화면을 나누기 때문에 먼저 bottomNavigationBar를 이용해 라우터를 구성해봤고 다른 방식을 이용해 라우터를 구성하는 방법들을 살펴볼까합니다.
다음글 - 페이지 상태값 유지하기 AutomaticKeepAliveClientMixin
프로젝트에서 사용된 코드는 Github 에서 열람 가능합니다.